
Hello again! It’s been quite some time since I wrote an article. My son is now 2.5 and between playing as much as I can with him and working I have been falling behind on posting new articles. The good news is I’ve got about 200 article drafts sitting in my stable of unfinished work, so as I get time I can start to polish them up and post them here.
Todays article was inspired by a question I got through Instagram (feel free to look me up on Instagram, @PhotolisticLife, and ask anything you’d like, I can’t always get back to people quickly but I generally respond to everyone). In response to the question I decided to write an article expanding on what works for me when trying to create dynamic urban landscape photography and perhaps you’ll find it useful as well.
So, how do you improve beyond snapshots and echoing other photographers work? In this article I’m going to talk about my approach to creating dynamic Urban Landscape photography and how you can do the same. There are no shortcuts here, creating the best photography you are capable of takes lots of work and patience.
Step One: Improve Your Vision
For more than a decade I have been studying various genres and sub-genres of photography (street, landscape, cityscape, landscapes astrophotography, portrait, macro, fine art fashion, etc…) and I’ve learned one overarching fact: You don’t know what you don’t know. What I mean is that the more I learned about each genre of photography the more my skills in all of the other areas of photography improved. I can’t tell you how many “uh-huh!” moments I had reading about landscape or fashion photography and connecting the dots with street or urban landscape photography.
Consider the elements that make up urban landscape photography for a moment… Architecture, people, and landscapes, right? It’s fairly logical to think that by being good at each one of the genres of photography you would have an advantage over a photographer who was only good at one of them, right? But what is good? It’s all relative isn’t it. Let me put it another way, by studying and practicing multiple genres of photography you open your mind to perceiving better, more unique composition as opposed to approaching your goal with tunnel vision. Simply put, you’ll see beautiful images where you never noticed them before.
Step Two: Be Bold
If you’re new to PhotolisticLife and/or photography please stop reading this article and study the Pyramid of Composition I developed years back. I can’t stress how helpful the Pyramid of Composition has been to my own photography (I’d have never been published in Nat Geo mag without it). Unfortunately (or fortunately if you love competition), it’s not good enough to photograph a beautiful urban landscape anymore. Anyone with a camera can trip a shutter and capture the same scene. You need to wait for the stars to align and create an image that is either impossible to replicate or nearly so.
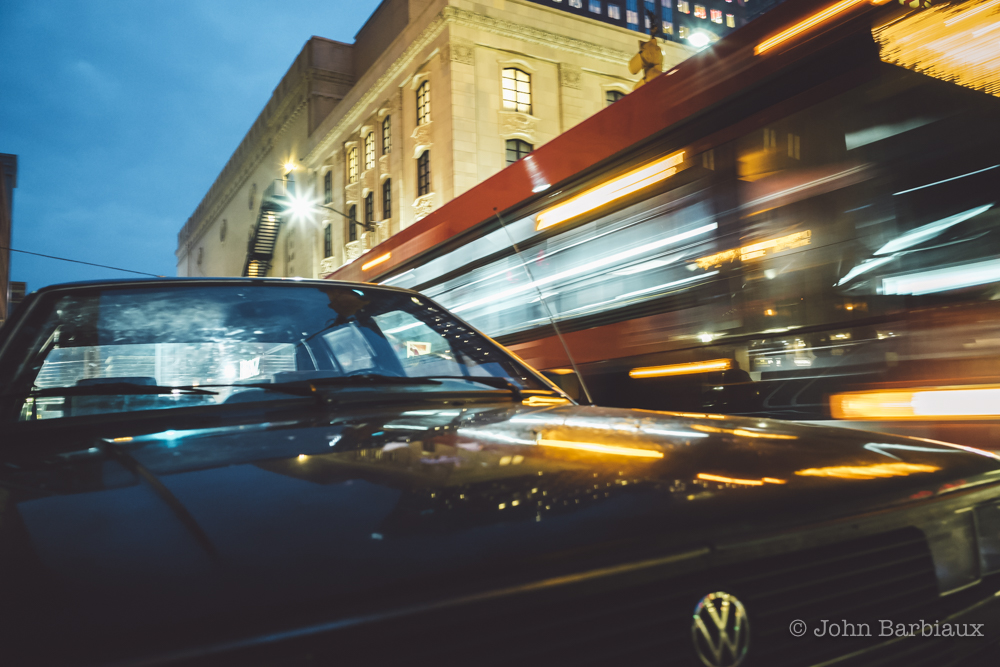
Take the image above for instance… It’s not the best image I’ve ever created it but it certainly illustrates my point I think. It would be nearly impossible to replicate this image with the bus driving by this vintage car with the Heinz sign visible through the rear windshield.

Step Three: Fill Your Frame
I don’t know, maybe this is personal preference… When I would study the paintings and photography I love I always noticed that the frame seemed to be filled but not claustrophobic, full-bodied if you will (for you wine lovers). Something always caught my attention and then pulled me into the image. I try to replicate this with my urban landscape photography, I like to have something start on the outside of the frame and pull viewers in from the left or the right of the image (oddly, it’s usually from the left…).
Step Four: Use Compositional Layers
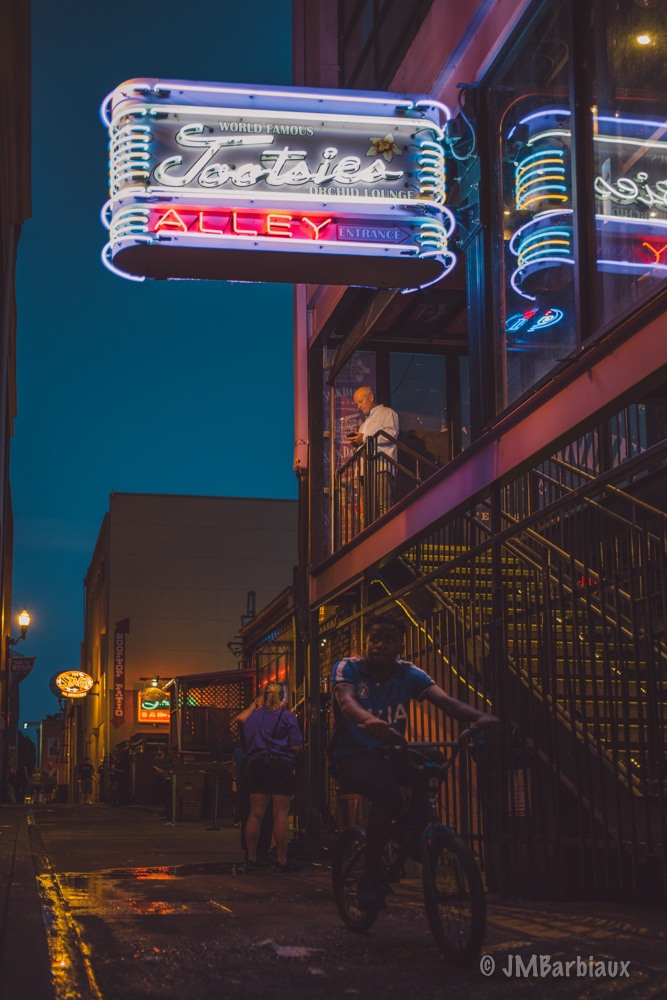
One of the most influential street photographers (or photographers in general) that I’ve studied is Alex Webb. He is a master at using layers. These aren’t the type of layers you’ve used or heard about in Photoshop. Compositional layering is similar to the Pyramid of Composition I mentioned above, the photographer layers multiple subjects throughout the photograph. For instance, the photograph above has a man on a bicycle in the first layer, the man at the top of the steps checking his phone is layer two, the woman in the blue shirt is layer three, while the neon sign is layer four. The other signs and people in the background are the final layer.
The difference between this type of layering and the pyramid of composition is that I used the pyramid to compose the image (reflections, leading lines, rule of thirds, etc.) and waited for my Compositional layers (the people) to take their places. I doubt I’d have ever created this image without having studied copious amounts of street photography.
Step Five: Experiment
Long ago, I once read that if you find a great scene you should work it until you can’t work it any longer. For whatever reason that really resonates with me. Really, it’s how I approach street photography as well. There are plenty of shots I pass on because they aren’t really worth the headache of the possible confrontation (I don’t ask permission before photographing strangers) but when I find something or someone who I think will make an amazing shot I’ll throw everything I’ve got at it.
More specifically, for urban street photography, this means I spend extra time walking around my subject and consider all of the possible angles to photograph from. I’ll often switch out lenses and try some wide-angle shots as well as telephoto. Remember, you don’t know what you don’t know yet. In this day and age with millions upon millions of photos being uploaded to social media platforms each and every minute, hour, and day it’s more important than ever to work your scene and try to find a unique perspective.
Step Six: Be Deliberate
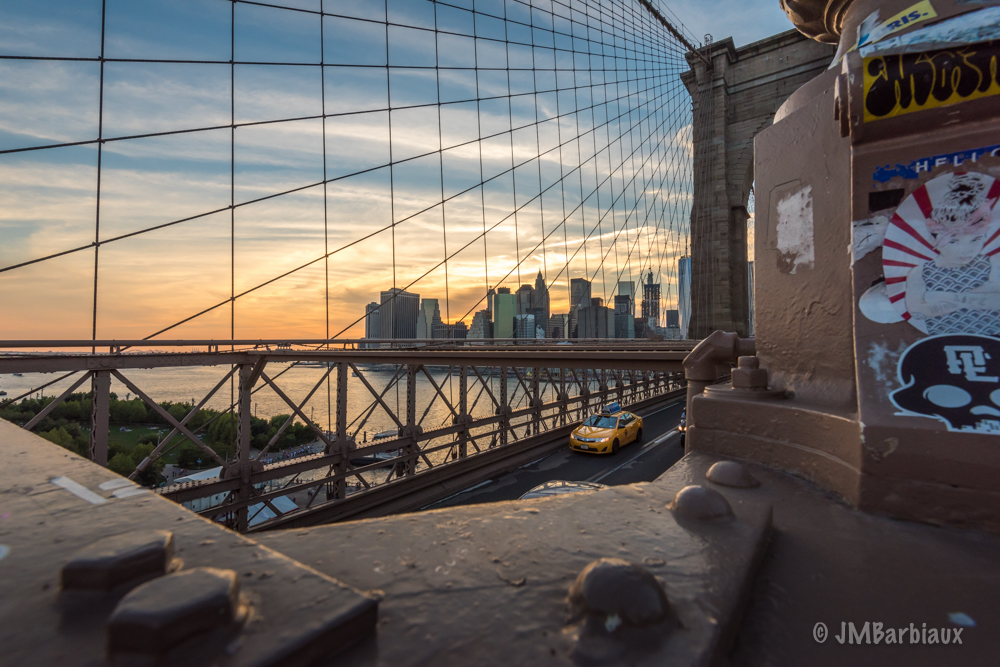
You are in control (to a degree) of what ends up in your frame. For instance, the Brooklyn Bridge photograph above was 100% deliberate. I had to take many shots and spend a considerable amount of time to capture the yellow taxi in the position you see it on the bridge. The taxi is not the main subject but it is a composition builder that makes a big difference… In fact, go ahead and look at the image and imagine there is no yellow cab and consider whether or not the image would look as good.
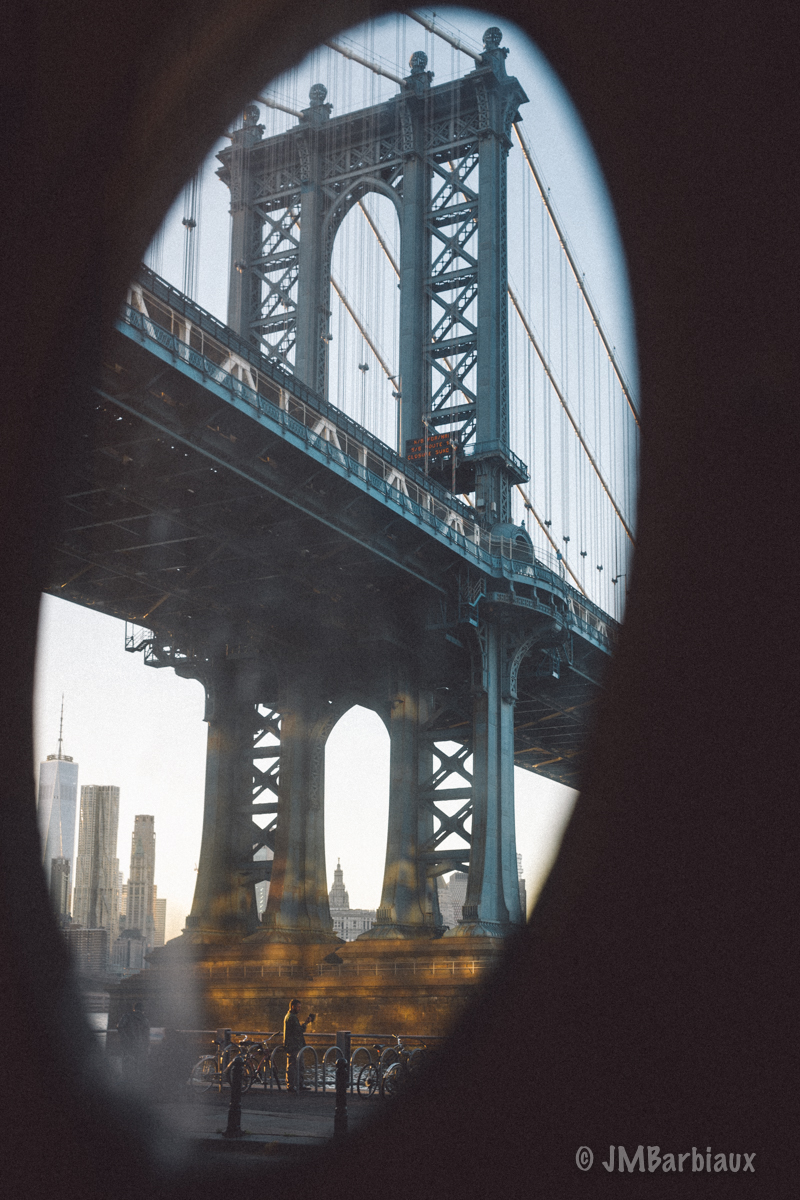
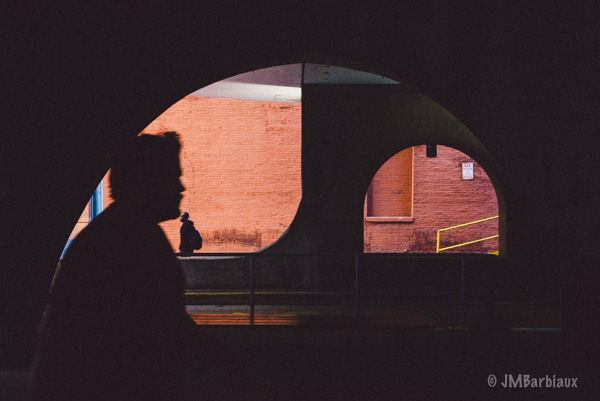
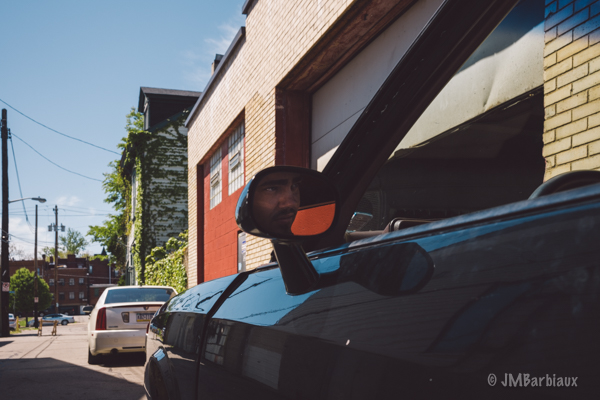
On the other hand, you also control what is not in your frame… Sometimes you’ll have situations where there are distracting elements like neon construction signs or cones that ruin a photographs aesthetics. You have four choices in a situation like this: Take the shot, don’t take the shot, creatively compose to keep the distracting element outside of the frame, or edit it out in Photoshop (not something I do but to each his or her own). The image above was a “creative compose” decision as I saw these port-hole like windows in the plywood surrounding a building that was under construction… As luck would have it, there was an opening in the wall and I quickly stepped in and waited for a subject to find their way into the right place in the frame to give the bridge some scale.
Step Seven: Perspective, Perspective, Perspective
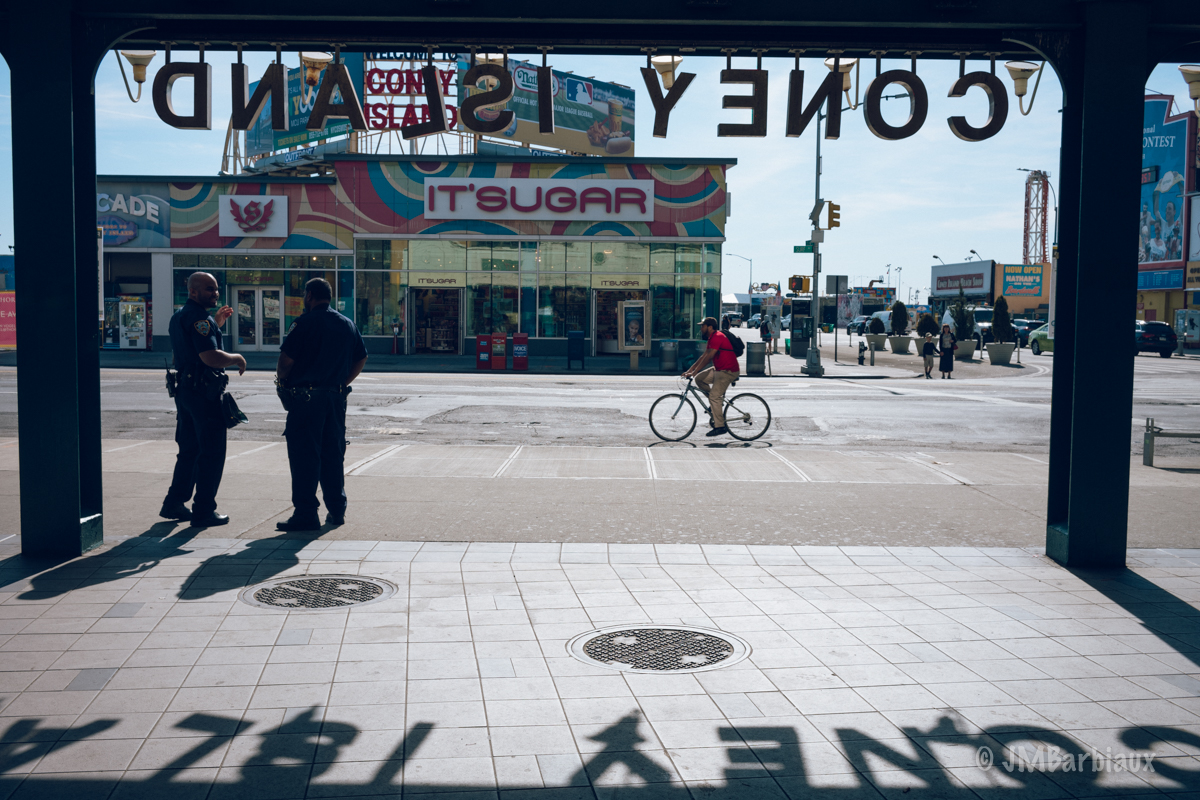
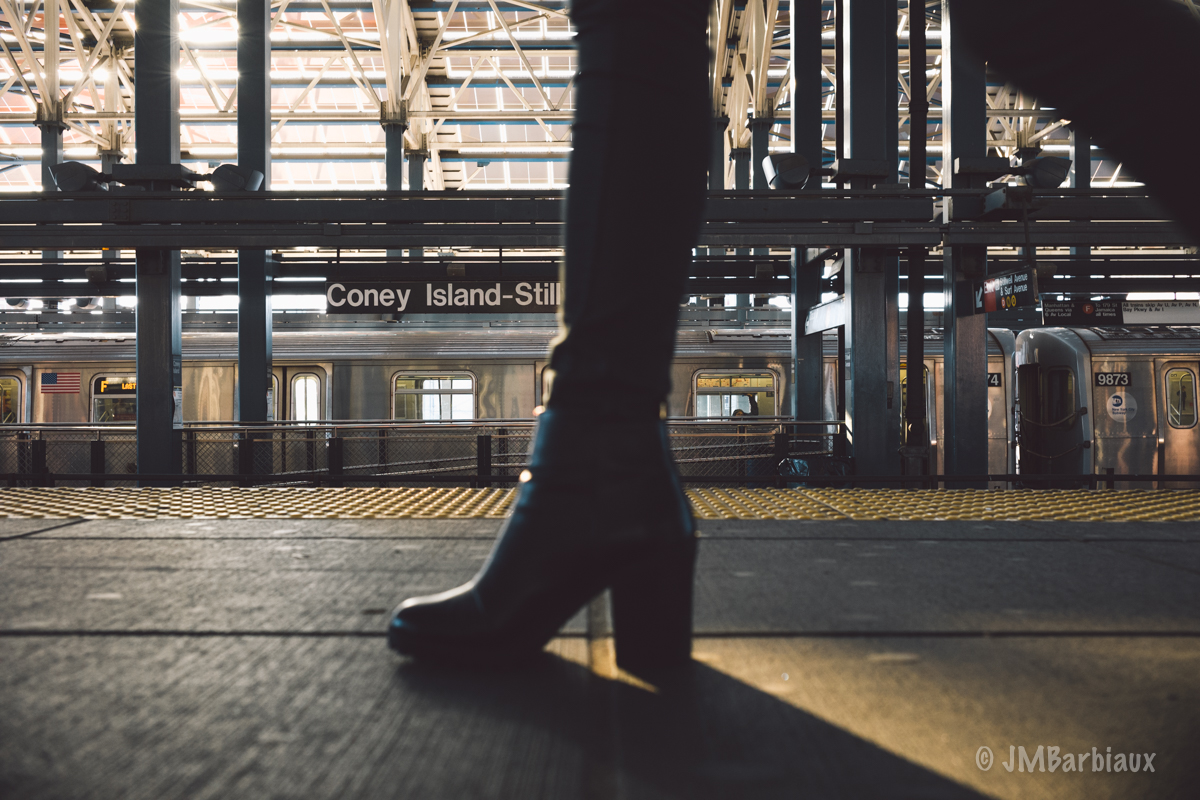
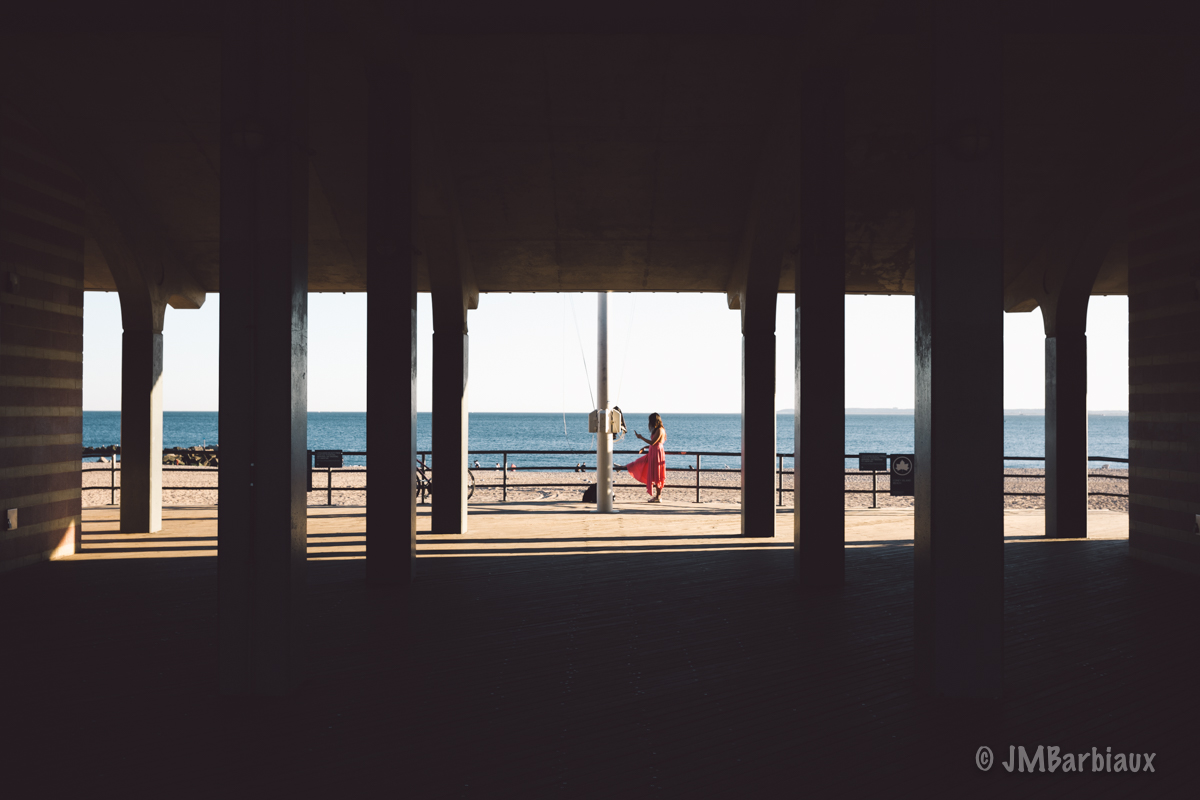
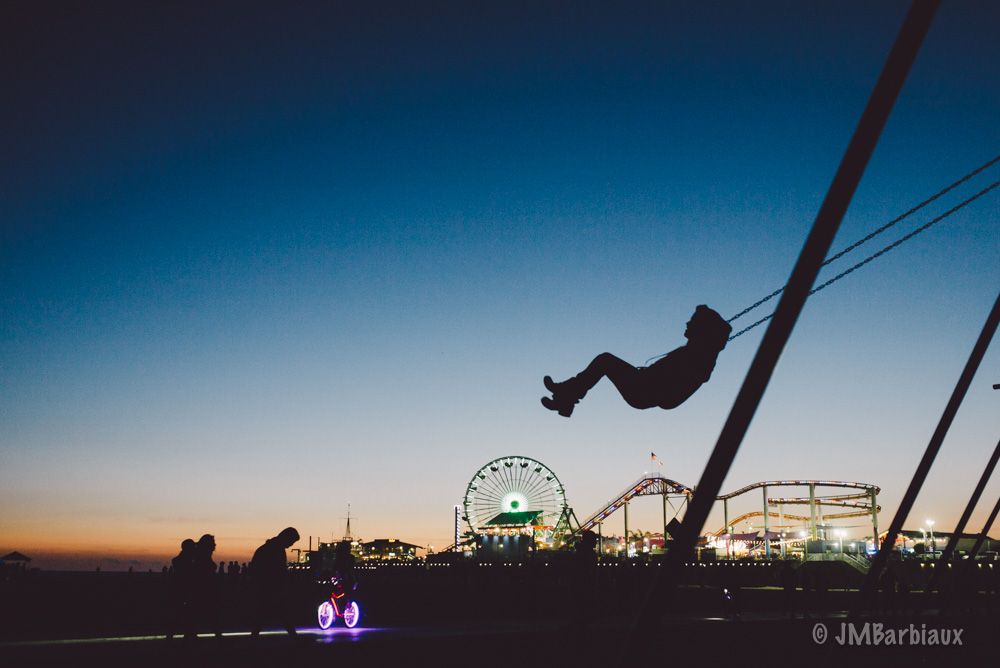
Have you ever noticed how a good story-teller can keep listeners on their toes, they seem to introduce facts in an original or interesting way that grabs attention. Your images should do the same. One of the easiest ways to do this is to find an interesting angle to shoot from. My favorite example is the recent project I did in Coney Island where I was trying to create some unique views of a spot that has been the subject of more photographs than there are stars in the sky.
The first image was taken from a ramp that takes riders from the train platform to the exit (or entrance depending on where you are going). As I was walking down from the train I noticed the light and how there was a gap that was conveniently large enough for my camera to stick through beneath the small fence separating the platform from the platform above. Next, all I had to do was wait long enough for an interesting scene to unfold.
Step 8: Lighting Is Everything
The image above was taken at Coney Island as well, I used the light and perspective to emphasize my subject rather than getting up close and losing the interesting atmosphere. Because of the light, I was able to crush my shadows and hide the fact that I was shooting through the entrance to the restrooms to capture this scene. But there is never a bad time to create urban landscapes, it’s just important to know what type of light works better for what type of images. For instance:
After Dark
After the sun has set and there is no more color in the sky it can become difficult to create interesting urban landscapes that have much sky in them… The sky turns black and you end up with lots of empty space. That’s great if you’re attempting some minimalist photography but for the rest of us, it just looks odd. In light like this I like to create images that limit the amount of sky or have something bright and bold that dominates the image.
In fact, I love a good challenge and I’m the type of person that generally starts with the most difficult scenario because I figure if I can master that then the rest will be a cake walk… So, I would recommend you spend a good amount of time on trying to create interesting images after dark using the steps discussed above.
Blue Hour
This is one of my favorite times to create cityscape photographs. During blue hours the artificial light and cement/glass buildings seem to really pop at viewers. With that being said, I have found that there is a fine line where at some point the sky gets so blue that it starts to give my image an appealing blue hue (even with proper white balance).
Pro Tip: A great way to battle this color shift is to stack a few photos from various times of shooting. I’ll often set up for a scene like you see above before the sun sets and shoot until after dark. By doing this, you can use Photoshop to stack a photograph from earlier in the day and use your brush to selectively bring some of the buildings color back.
Sunset/Sunrise
I mean, you can do any type of photography in this light… It’s called the golden hour for a reason. I actually prefer to be in the city and working with light that has been diffused during this time. I know this sounds crazy but if you think about it, everyone is photographing cityscapes at sunset, it’s being done over and over again… I feel like my time is better spent trying to capture images in places where people aren’t shooting at times they aren’t shooting there.
Harsh Light
There is nothing wrong with harsh light. Contrary to popular belief, this isn’t a time to hang up your camera and relax. In fact, if you think about it, if everyone else is hanging up their cameras during this time of the day you are much more likely to capture some unique urban landscapes. Though I will say, this light is avoided for a reason, it’s much more difficult to capture great images that really catch viewers attention in harsh light.

If you don’t believe me, head underground… The subway is a great place to spend some time with your camera. Exercise caution as it’s sometimes less populated and more dangerous that some areas in a city. Look for interesting architecture and use them to frame your subjects. Just like any other photography, be prepared to sit and wait for the right subject to work their way into your frame.
Step 9: Human Element
As I mentioned earlier, one of the keys to better urban landscapes is creating images that can’t be easily reproduced. The best way I have found to do this is introducing the human element. Think about it… What do urban landscapes represent? Humans impact on their environment, right? So why wouldn’t we include humans in our composition? Why do some photographers work so hard to ND filter or Photoshop them out? I’ll tell you why, because they can’t be controlled and can often add distracting elements to your scene. That’s where you’ve got to have monk like patience and simply wait for serendipity to strike.
Step 10: Rinse, Wash, Repeat
Seriously, practice makes perfect. But in all honesty, I just needed something here because ending at step 9 felt weird. Now I can say “10 steps to…”, which is obviously better than “9 steps to…”. See?
Conclusion
I can’t over stress how important the pyramid of composition is here. Using one of these steps is sure to give you great results but when you combine them you will end up with amazing photography that looks/is professional. Forget about focusing on the gear you think you need and focus on creating the best images you can with the most important gear you own… Your noggin.
Though I have not had as much time as I’d like to post articles I’m still updating my Instagram feed with current project images and you can follow me there @PhotolisticLife if you’d like. Feel free to leave your thoughts in the comments section below.
Excellent article. Thanks for posting!
Hey, thanks for the feedback. I truly appreciate it.
Good article, as always! I would love to see a photo of the actual shooting conditions for some of these photos in order to truly appreciate what you went through to get the shot. I am so used to seeing beautiful work from you that I tend to think these scenes just sit there waiting to be photographed. I think many of us would be shocked to see the actual surroundings you came upon and then had the vision to see the final product.
Hey! That’s a great idea. I’ll try to keep that in mind next time I’m out and about. I’m kicking around making some videos of shooting in the “wild” with tutorial like info but I hate the sound of my own voice… So we will see. lol. Have a great night.
Inspirational. I especially love the “be bold” image.
Thank you! I hope all is well in your neck of the woods. Nice to hear from you.
I’m pretty sure the bridge is the Manhattan Bridge and not the Brooklyn Bridge which has stone support pillars. And I can’t find the taxi you mention. Now that that is done… good article on what it takes to make a photo in the wild of the city. Keep the articles coming please.
Hi Lewsh, the Brooklyn Bridge is in the photo above that… I’m afraid I did a poor job of mentioning that. If you look at the image above you’ll see the correct bridge and the taxi I mentioned. Thank you for the feedback as always, I hope to get more articles published in the near future. Have a great night.
You’re correct as to the identifications of the bridges in the article. I jumped before I looked. No need to say that you did a poor job. Maybe if I opened my eyes I would have seen things in their proper perspective. As requested before, please keep the articles coming. I get the urge to get out and shoot after reading your articles. High praise I must say.
Thank you!